Until recently, building your own custom-made tool was expensive. You had to assemble a team, write a specification, go through weeks of development, and then maintain it all. That is why most companies stopped at automation: we connected ready-made building blocks in Zapier, Make, or n8n. It worked, but it had a ceiling.
The more unusual the logic, the more workarounds and fragile connections were needed, breaking with the first change on the API side.
Plenty of tool ideas were never built for one simple reason: the numbers did not add up. The cost and time required were so high that, with an uncertain return, it was not even worth starting.
AI is changing this. Today, you can go one level beyond “building-block automation” and create a fully functional tool in a very short time; something that, until recently, would have cost so much that building it would not have made sense. Not a prototype for a demo, but something that genuinely becomes part of everyday work.
I will show you an example of the path we followed at House of Angular: in three weeks, we built a working tool for our client.
Key Takeaways:
- AI has lowered the barrier to building custom internal tools so significantly that ideas previously dropped due to cost and complexity are now worth pursuing.
- The campaign-generator tool, which our team at House of Angular built for our client in 3 weeks, handles contact research, email verification, and personalized campaign generation, and is already running in production.
- Before writing a single line of code, create project memory files so Claude follows your project’s rules instead of guessing.
- Choosing an “AI-friendly” stack means fewer unexpected issues during development.
- Spec-Driven Development is the core of the method we used at House of Angular: the specification is the first artifact, and code is only written as its implementation.
- The grill-me step surfaces edge cases and hidden assumptions at the stage when fixing them doesn’t mean a rewrite.
- Build layer by layer: database first, then endpoints, then features one at a time, so when something breaks, you know what caused it.
- Staging and production must be separate environments, even if the tool has just one user other than yourself.
- Two layers of documentation are mandatory: one explaining how to work with the repository, and one explaining what the tool does and why.
- API keys and secrets never go into the repository.
- Controlling AI costs comes down to two rules: use light models for simple tasks, and cache context that doesn’t change between calls.
- The method we used at House of Angular works equally well whether you’re building a tool for yourself or delivering it to a client.
Background: What was the Challenge?
For a long time, marketing at our client’s company looked like this: someone received a file containing a hundred contacts, manually checked each company on Google, added notes, and then created personalized email and LinkedIn message sequences from scratch. Hours every week, starting over every time, with the quality depending on how much energy that person had on a given day.
Today, this is handled by a tool we built for the client in Claude Code: campaign-generator.
How does the tool we built work?
You upload a file with contacts, and the tool independently researches the companies (with an Apollo integration and an internet search engine running in the background), verifies email addresses, and generates ready-made, multi-touch campaigns based on the client’s playbooks. It is running in production and is used by the client’s marketing team.
This distinction is important: we did not build it for our own needs but as an internal tool for the client, tailored to their process, rules, and campaigns. And this is exactly what makes this approach interesting: the method described here works equally well whether you are building something for yourself or delivering it to someone else.
And now the most important part, especially if you are not a developer:
To have something like this, you do not need a development team or months of work. You need the right approach.
This text is about that approach: what to do, in what order, and which mistakes to avoid.
How Long Did Building the Tool Take?
The entire project, from the start to the production deployment, took three weeks:
- Week 1: foundation. Gathering requirements, understanding the business context, preparing the specification in Kiro, and creating initial mockups using the target design.
- Week 2: development. Building the tool in Claude Code with frequent client feedback. Short loops, not months of silence.
- Week 3: deployment. Deployment and real testing using real data.
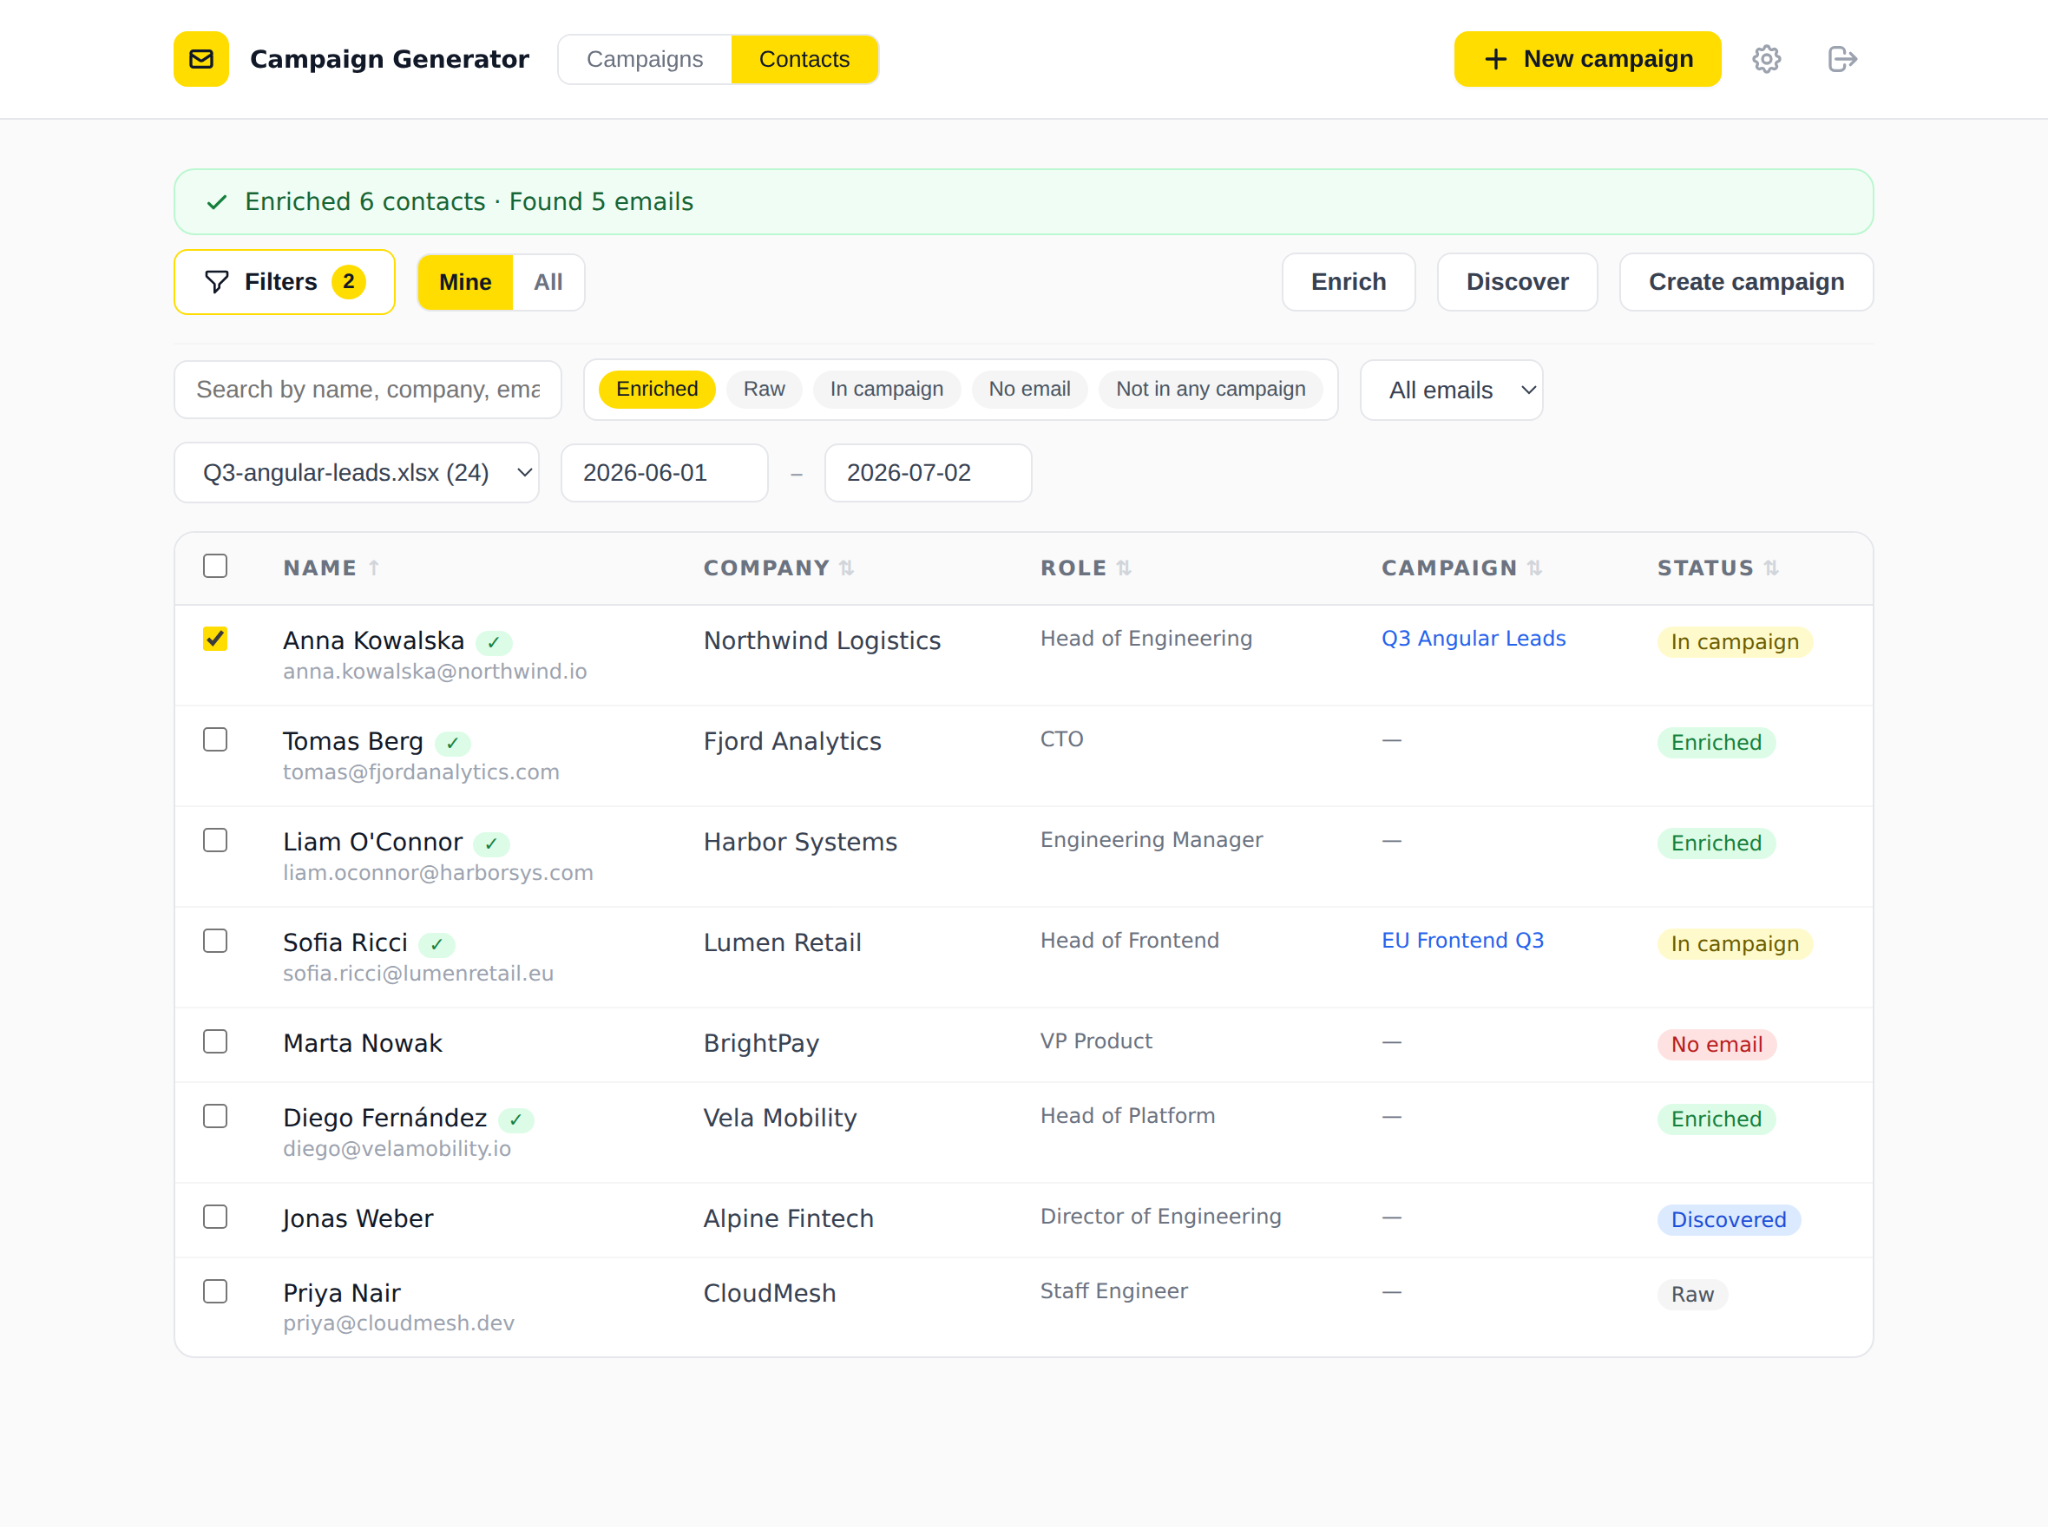
Main view — contact list with filters and statuses. Sample data.
Where to Start Building? A Foundation Instead of “Build Me an App”
The temptation is always the same: you open Claude Code and write, “Build me a campaign tool.” You will get something that looks like it works, and falls apart after the third change. Working with Claude Code is not the same as ordering an application. It is a conversation with a code repository in which you set the direction, while Claude writes the code and explains what it is doing.
The first thing worth creating before any code is written is the project memory. In Claude Code, this is handled by the CLAUDE.md and AGENTS.md files. Claude automatically reads them at the beginning of every session. This is where you describe how to work with this particular project: what the stack is, what the workflow looks like, and what pitfalls to avoid. Thanks to this, Claude does not write code “from memory,” but follows the rules established for your project. It sounds trivial, but in practice, it is the difference between a tool that works and one that strangely keeps breaking.
The second foundation is choosing an “AI-friendly” stack. We chose Next.js
- Vercel + Neon (Postgres) + TypeScript. Not because it is the only correct combination, but because it works exceptionally well with Claude: it has excellent documentation, can be deployed with a single push, and the database has built-in “branching,” which I will discuss shortly. The more popular and better documented the stack is, the less Claude has to guess.
🤖 See how AI can help in different areas of development: Case study “I Migrated a Production AngularJS Dashboard to Angular 21 in One Day with AI” by House of Angular’s own Team Leader.
Spec-Driven Development: the Heart of the Entire Method
This is the section to remember if you do not remember anything else.
Do not start with code. Start with a specification. Throughout the project, we followed a Spec-Driven Development (SDD) approach, meaning the specification is the first artifact and code is created only as its implementation, not the other way around.
A specification, or spec, is a short document describing what is actually supposed to be built before it is built.Our repository contains a SPEC.md file, a real example of how we expanded the tool with tabs, contacts, and enrichment. It contains several sections, each serving a specific purpose:
- Context: what the current state is and what the user wants. Five sentences, not an essay.
- Data schema: which tables and fields are being added to the database. This is where decisions are made that will be the most difficult to change later.
- Flow architecture: what happens step by step: “file upload → parsing → preview → enrichment → contact view.” This is often drawn directly in the file as a simple ASCII diagram.
- Implementation plan: a list of specific files and endpoints that need to be created.
- Verification: and this is the part people skip, even though it is incredibly valuable: a checklist answering, “How will I know that this works?” For example: “upload + Preview Contacts → a table containing raw data is displayed.”
The spec itself does not need to be created manually. To prepare it quickly and accurately, we used kiro.dev, an environment built around spec-driven development itself. Instead of generating code immediately, Kiro guides you through the specification structure: requirements → design → tasks — asks questions, and helps you complete the document before anything is built.
The result is a consistent and complete spec created in a dozen or so minutes, rather than after an hour of manual writing, and one that Claude Code can then read without guessing.
Once you have a spec like this, you ask Claude to propose a plan first and only then start writing. Claude breaks the work down into steps, you check whether everything makes sense, then make corrections, and only then does it move on to the code. At the end, you go through the verification checklist point by point. This turns “I hope it works” into “I checked that it works.”
grill-me: Interrogate Your Idea Before Production Does
There is one step between “I wrote the spec” and “I am writing the code” that saves the most frustration: putting the idea through the grill-me skill. This tool does exactly what its name suggests—it grills you. It asksa series of uncomfortable, probing questions that expose hidden assumptions and edge cases:
- What happens when the file contains duplicate or empty columns?
- Who can see whose contacts? Can one marketer see a colleague’s contacts?
- What do we do when enrichment does not find an email address?
- What happens when you import the same contact twice?
The answers to these questions go back into the spec, completing it. As a result, edge cases are discovered before implementation, at a stage when fixing them costs one sentence, rather than after deployment, when it causes an outage and requires explanations to the team.
The spec says what you are building; grill-me makes sure you have considered what the spec has not yet anticipated.
How We Built the Tool, Layer by Layer
Once the spec is complete, you build from the bottom up. Not everything at once; layer by layer.
Layer One: Data
The database comes first. We use Neon (Postgres) and follow one rule that saves a great deal of pain: migrations are idempotent. In practice, this means that a script changing the database structure (ADD COLUMN IF NOT EXISTS …) can be run once, ten times, or a hundred times, and nothing bad will happen. There is no situation where you think, “Oh, I already ran this migration, so now it will fail.” You run /api/migrate after every schema change and do not have to worry about it.
Layer Two: Logic
Next come the endpoints: small addresses in the application that perform specific actions. One parses an uploaded file, another researches contacts through OpenAI (with the internet search tool enabled), a third verifies email addresses, and a fourth generates ready-made campaigns.
There is an interesting point worth noting here: Claude writes code that uses AI itself. The tool calls an OpenAI model internally to perform research and write emails. In other words, one AI builds a tool powered by another AI, and today, this is a completely normal setup.
At this stage, we also integrated Apollo for reliable data instead of guessing. Research performed by a language model alone is not enough when you need reliable company and contact information.
That is why we added an Apollo integration, which enriches two layers at once. We enrich the company using only its domain (industry, team size, and location) through an inexpensive lookup that does not consume paid credits. Contacts are processed in two stages: first, we perform a masked, free overview of people at a given company.
The tool immediately classifies them as developers, technical decision-makers, or business decision-makers, while filtering out roles outside the target group. Only for selected people do we “reveal” the complete data: verified email address, job title, and LinkedIn profile. Credits are therefore consumed only for contacts we are genuinely interested in, rather than for the entire list.
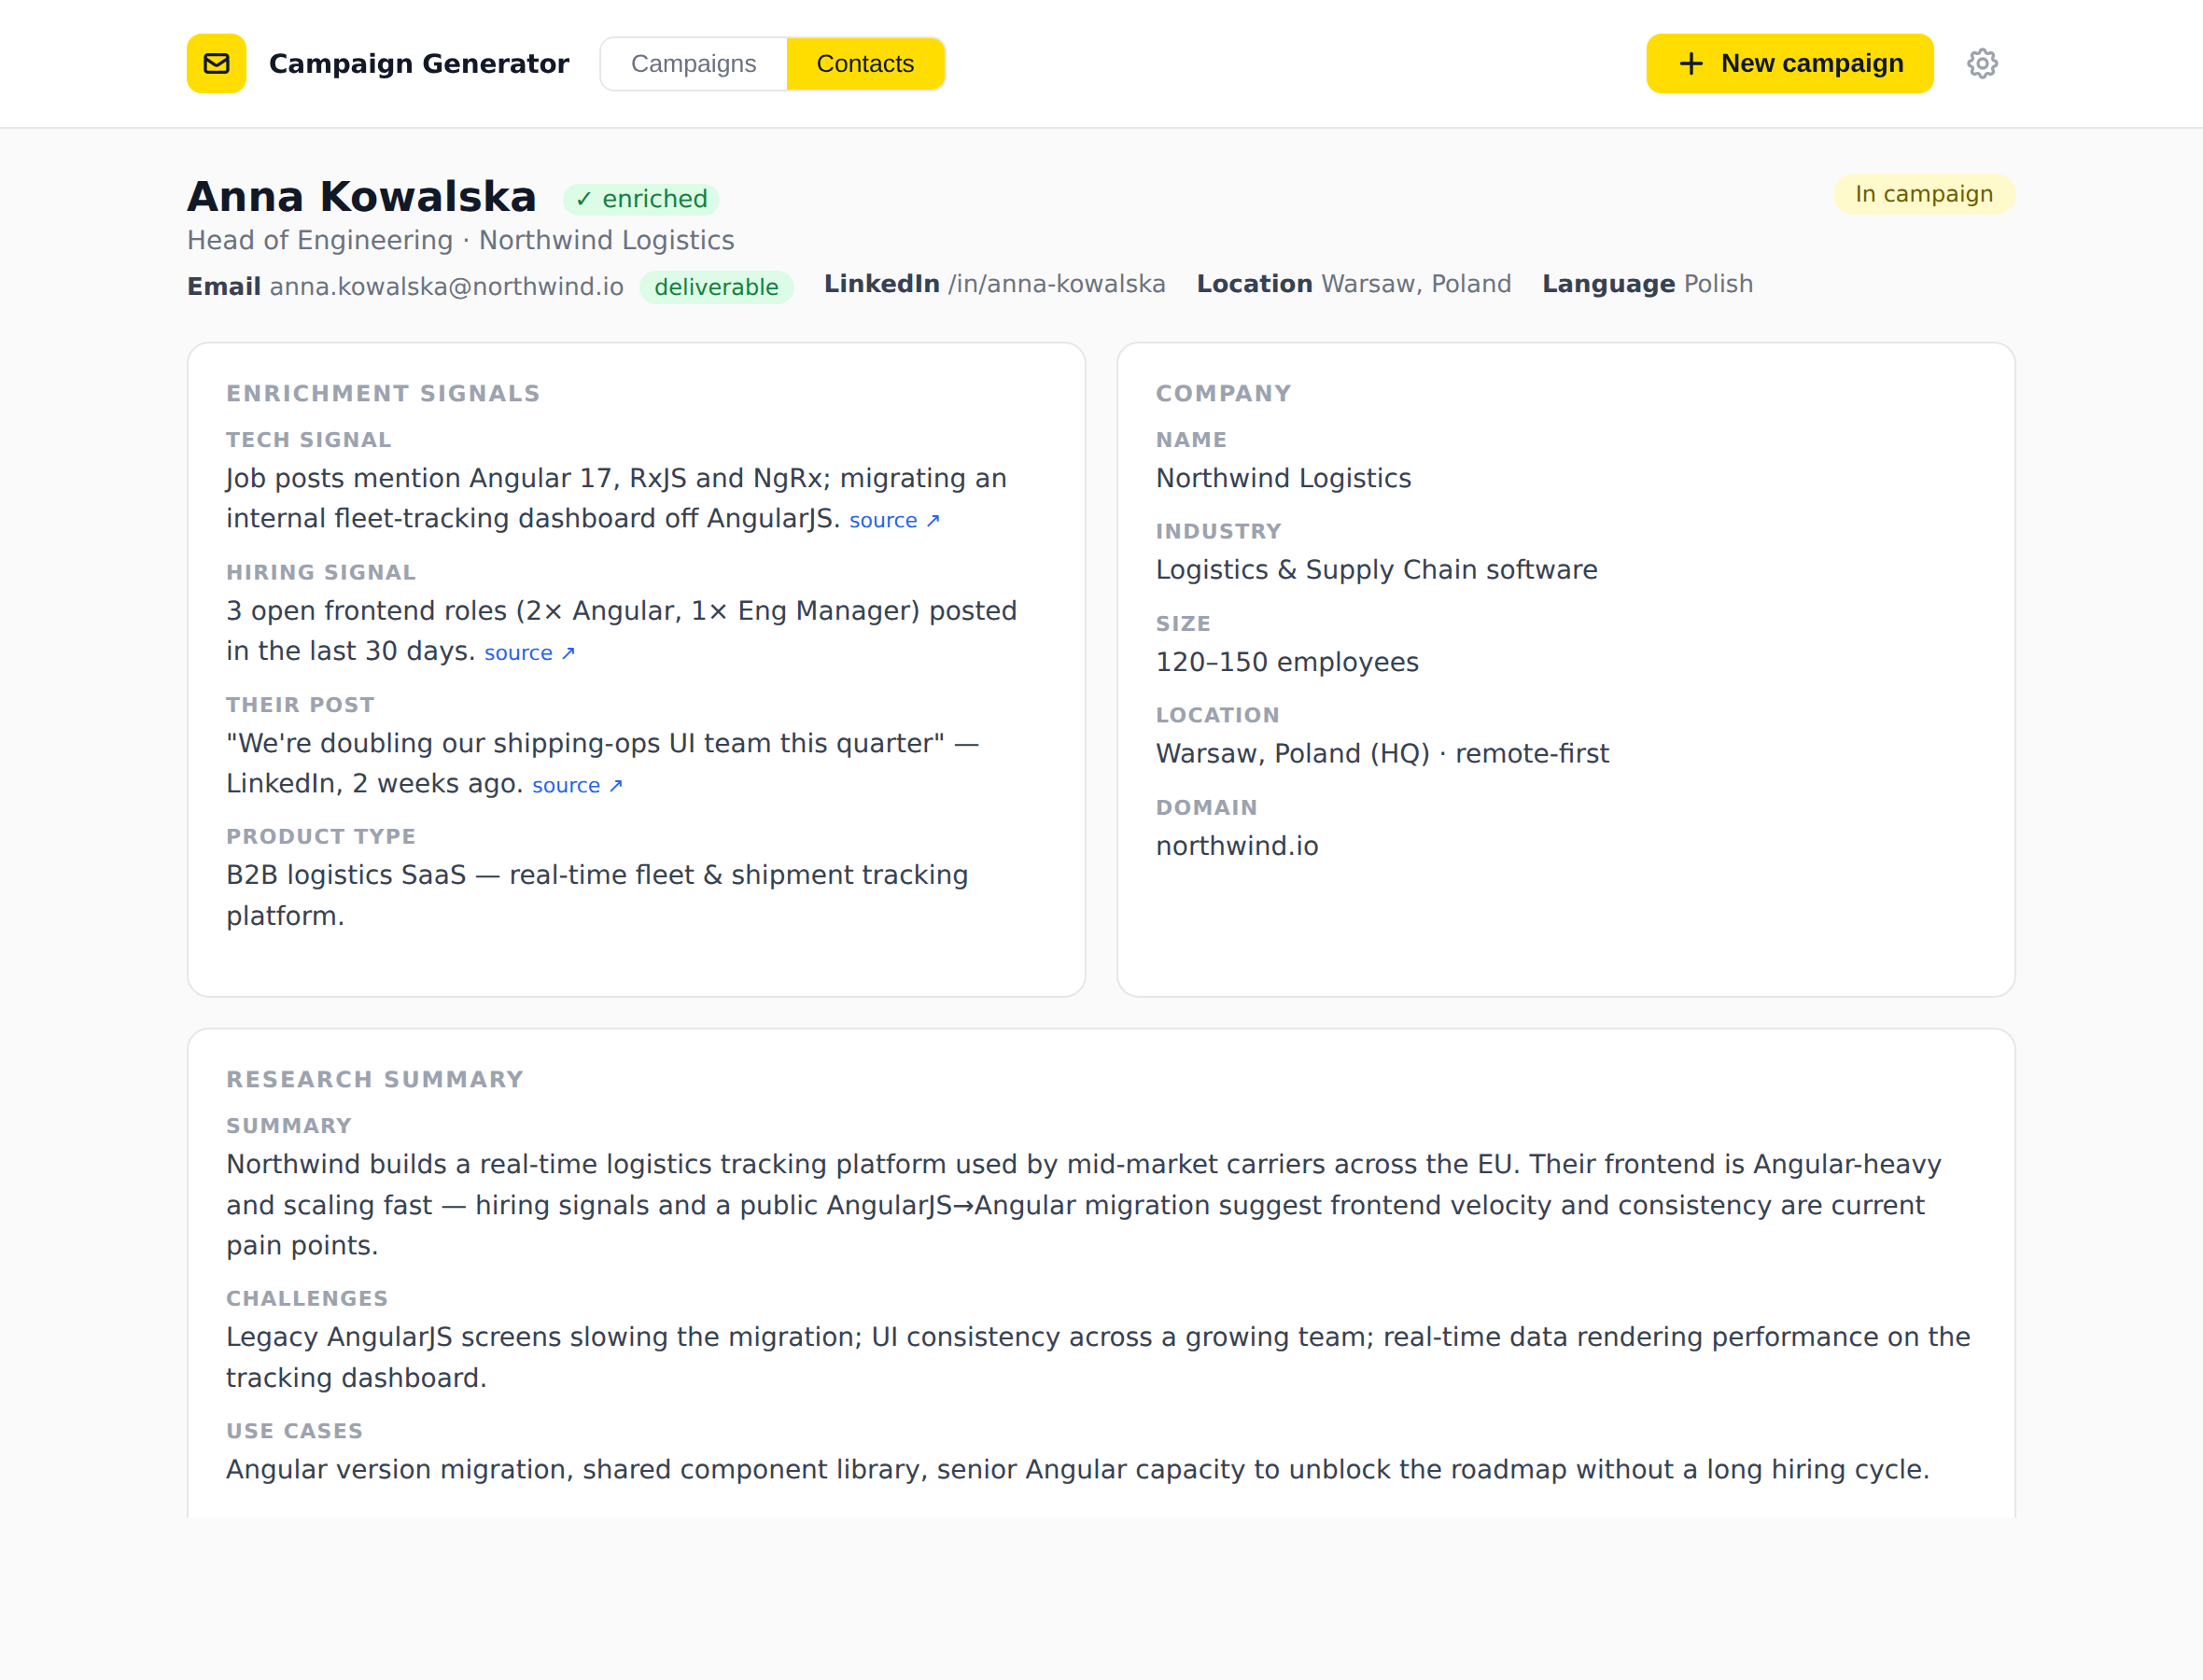
Enrichment results: the tool automatically gathered company and contact signals, including links to the original sources. Sample data.
Layer Three: Iteration
Features are added one at a time: first, the import works; then the preview is added; then enrichment; and finally generation. Every time, there is a small spec, a small piece of code, and verification. Thanks to this, when something stops working, you know exactly which most recent step caused it.
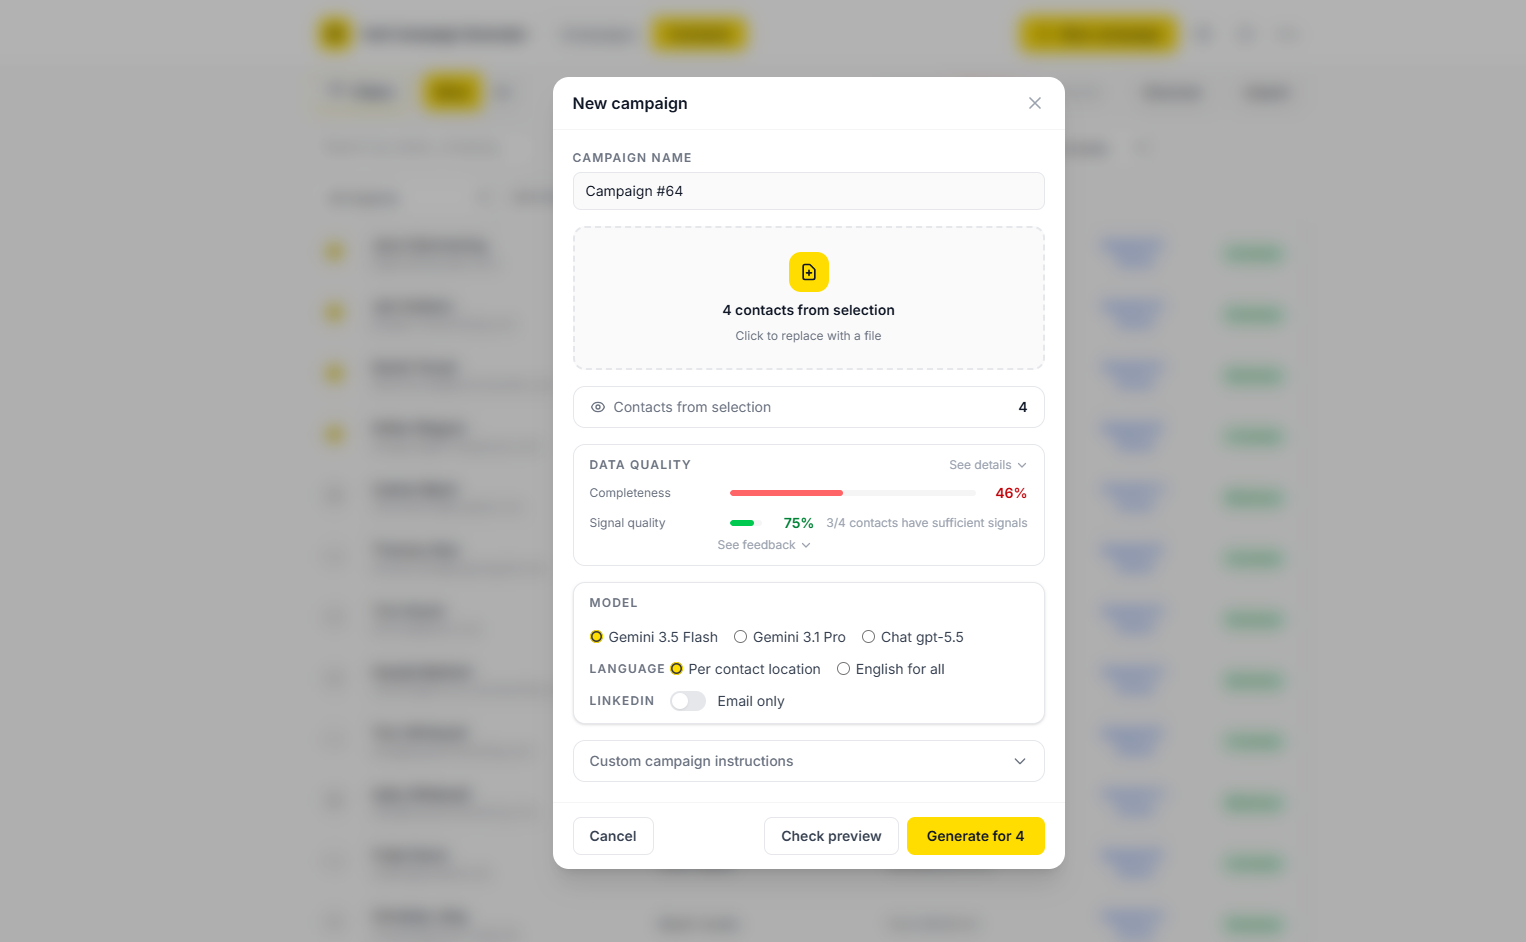
Campaign configuration before generation. The tool immediately shows data quality and completeness, lets you choose the model and language, and keeps LinkedIn disabled by default.
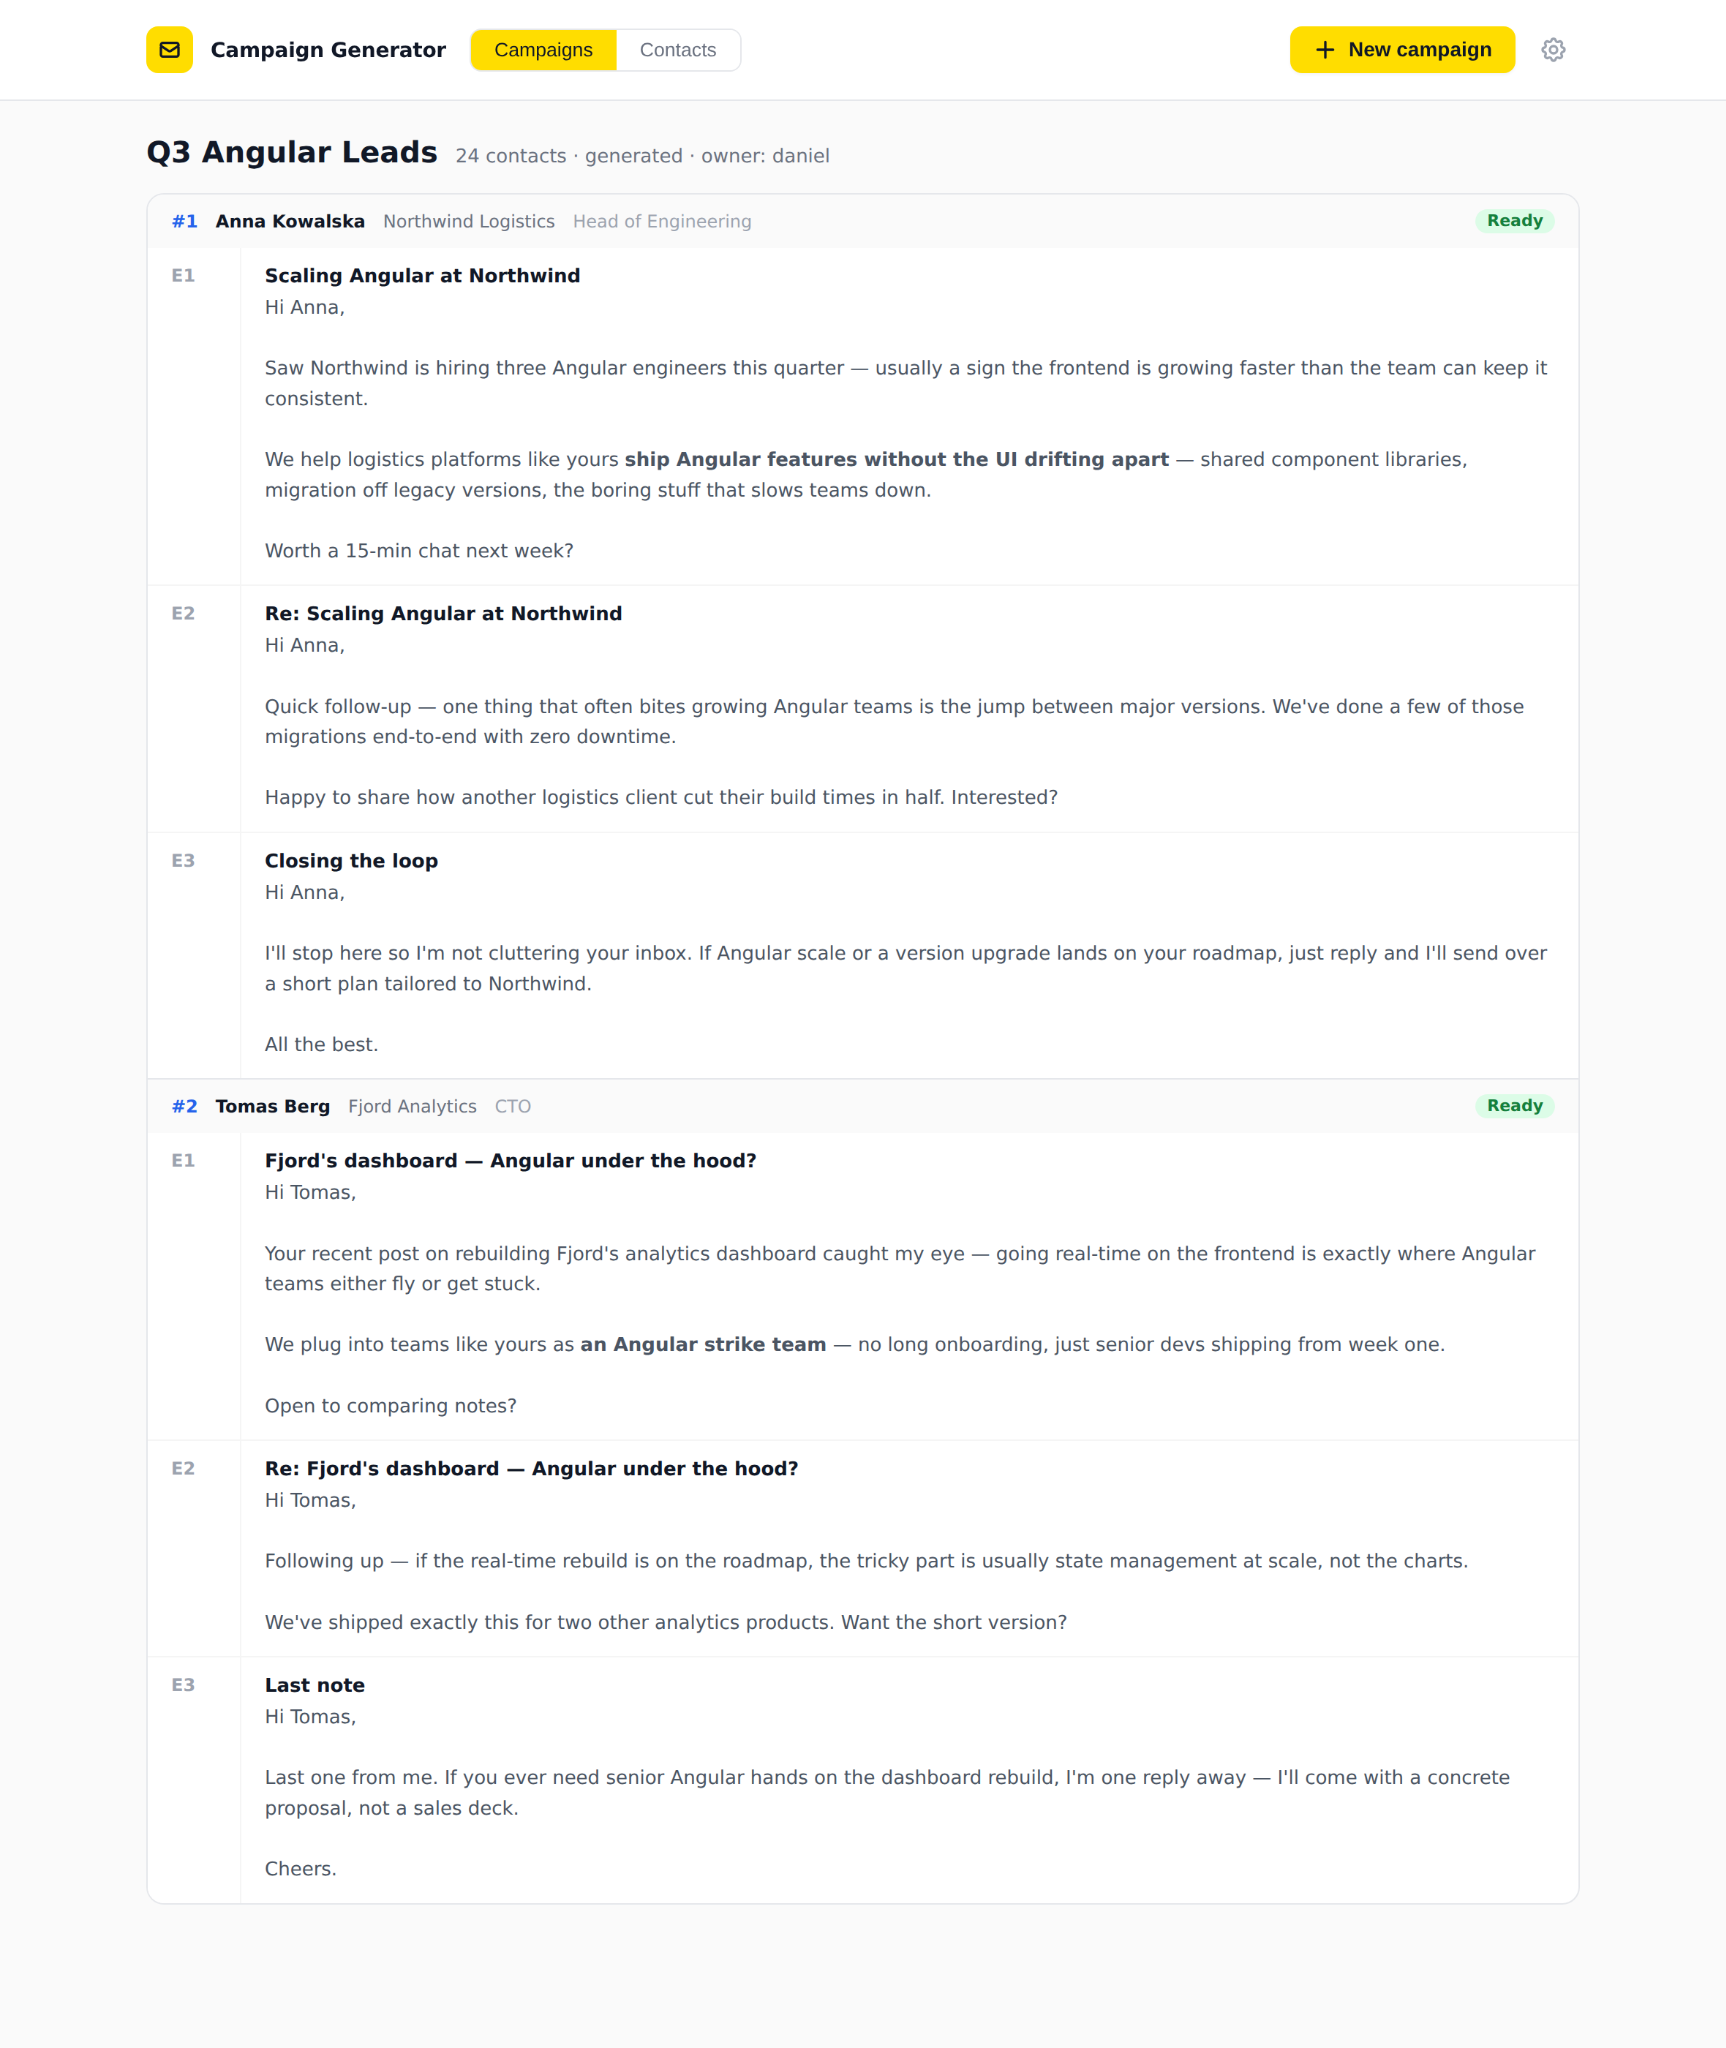
Generation results: ready-to-use, personalized sequences (E1/E2/E3) for each contact, editable directly in place. Sample data.
🤔 Did you know AI could help build your new functionalities, too? See this case study “AI Built a Figma-like Canvas Viewport in My Enterprise App in 4 Hours” by Mateusz, a Team Leader at House of Angular.
UI: What We Actually Built
I will be honest here, because this is a common temptation: today, you can use ready-made component sets (such as shadcn/ui) or interface generators (such as v0.dev) and have an attractive screen in five minutes. It is a good approach if you are starting from scratch and do not yet have your own style. We took a different approach.
The campaign-generator interface is built using raw Tailwind v4 (a styling method where you define the appearance directly next to the elements), supported by two specialized building blocks: TanStack Table for the contact tables (sorting, filtering, and pagination across hundreds of rows), and TipTap as the text editor in the playbook settings. The choice was deliberate: tables and editors are exactly the areas where ready-made, specialized libraries offer more value than a general component set, while we wanted the rest of the interface to look exactly the way we wanted.
Throughout this process, Claude works like an on-call frontend developer: you say, “Add a status filter that survives a page refresh,” and it knows where to connect it and how to save the state. You do not need to understand every line of code, but it is worth understanding what you are asking for.
Deployment on Vercel: From Local to Production
The most enjoyable part. Vercel is connected to the repository so that a push to a branch equals a deployment. There is no separate “uploading to a server.”
This brings us to a rule that cannot be ignored when a tool is used by real people: you need two separate environments—a test server (staging) and production. Staging is a complete copy of the application where you test everything “live” before it reaches real users. Production is what the client uses. These two environments should never be combined because then every experiment you run is tested on the person who happens to be trying to do their work at that moment.
This is not a luxury reserved for large teams.It is the minimum requirement when the tool has even one user other than yourself.
This is what it looks like for us, and we call this rule staging-first:
devbranch → staging / test server (…-git-dev-…vercel.app), with automatic deployment after every push. Every change goes here by default.masterbranch → production (…vercel.app), only when we deliberately want it to.
Importantly, staging also has a separate database, so you do not test using client data. Neon (our database) allows us to “branch” a copy of the production database with one click, so the test environment contains realistic data but remains completely isolated. A broken import on staging does not affect anything the client sees.
A normal working day looks like this:
git checkout dev
git add -A && git commit -m "change description"
git push origin dev # Vercel will automatically deploy to stagingWe only move to production after checking everything on staging, and only after an explicit “let’s deploy to production.” Thanks to this, the production client is never used as a guinea pig.
Two pitfalls we learned about the hard way and documented in AGENTS.md so that we would not repeat them:
- Secrets can be “write-only.” Sensitive variables, such as API keys, are write-only in Vercel. You cannot retrieve them from staging to copy them to production. You need to have the original value. It sounds minor, but it costs half an hour of confusion when you do not know about it.
- Run the migration immediately after deployment. When the database schema changes, the new code expects columns that do not yet exist, and for a moment, endpoints return an error. That is why we run the migration,
/api/migrate, immediately after the deployment is ready, preferably during a quieter part of the day.
And one basic but often overlooked rule: secrets never go into the repository. API keys, passwords, and the database connection string—everything is stored as environment variables in Vercel, never in the code. The code is public within the team; a secret included in the code is a compromised secret.
Maintenance: How to Make Sure the Tool Lives Longer Than a Week?
Building a tool is easy today. The real challenge is making sure that, six months from now, anyone (including you and Claude itself) will know how it works and why it works the way it does.
This is why I consider several practices mandatory.
Two Layers of Documentation
This is the point I most want you to remember. CLAUDE.md alone is not enough. You need two different documentation layers because they answer two different questions:
CLAUDE.md/AGENTS.md: “how to work with this repository.” The stack, deployment workflow, order of steps, technical pitfalls, and commands. Claude reads this at the beginning of every session. This is the layer for the machine and everyday work.- Business logic document: “what it does and why.” Domain rules, glossary, how the tool works from a business perspective, and context not visible in the code. In our case, this is
Business-Context.mdtogether with the playbooks (01-campaign-strategy-playbook.md,02-messaging-style-playbook.md, and03-contact-enrichment.md) stored in a separate repository. This is the layer for people and for understanding the purpose of the tool.
Without the second layer, the code becomes a mystery after six months: you can see that something makes five attempts to match an email address, but you do not know why there are exactly five attempts or why they happen in that order. Business logic written in plain language is not bureaucracy; it is a translation of intent that code itself can never fully express.
⚙️ Everyday maintenance of your tool can be easier than you think. Read this case study by House of Angular’s Team Leader: Auto-Fixing Production Bugs with BugSnag + Claude Code.
Post-Deployment Verification Checklist
In AGENTS.md, we have a specific checklist describing what to click after deploying to production to confirm that nothing has broken. Log in, check whether contacts load, check whether campaigns load, upload a small test file, run enrichment for two contacts, and see whether the filters survive a page refresh. These ten minutes turn “it probably works” into “I know it works.”
An internal tool that quietly stops working is worse than having no tool at all, because people trust it.
Controlling AI Costs
Since the tool calls language models, every call costs money. Two simple rules keep the bill under control. First: use a cheaper model for simpler tasks. In our case, column detection in a file is handled by the lightweight gpt-4o-mini, while complex research and email writing are handled by a more powerful model. There is no point using something heavy to perform a simple header-matching task. Second: caching. Playbooks do not change for every contact, so once the context has been provided, it is remembered and does not need to be sent repeatedly. Lower bills, faster responses.
Bonus: A Short “Also Worth Doing” List
- Idempotent migrations: described above, but I will repeat it: they are the foundation of sleeping peacefully.
- Health check: a simple
/api/healthendpoint that says, “I am alive.” Trivial, but invaluable during a crisis. - Roles and permissions from the beginning: in our case, an admin can see everything, while a marketer can see their own contacts and playbooks. Adding this later means rewriting half the application.
- A plan before code and small commits: ask Claude to show you the plan first; make small, descriptive commits. When something breaks, reverting it takes one operation instead of an investigation.
Summary: a Recipe for Getting Started
campaign-generator proves that a well-designed internal tool, whether for yourself or for a client, does not require an IT department. It requires a method.
What it gave the client: independence, because they do not have to pay for another external SaaS product that handles only 60% of what they need; speed, because an idea changed in the morning can be working on staging by the afternoon; and a tool tailored precisely to their process instead of the averaged process of “everyone,” all within three weeks from the start to production.
And for us, a repeatable method that we can apply to future projects.
If you were going to start tomorrow, here is the minimum recipe:
- A repository using a simple, well-documented stack. In our case, Next.js + Vercel + Neon.
CLAUDE.md—the project memory: how to work, what the workflow is, and which pitfalls to avoid.- A spec for the first feature: context, data, flow, plan, and verification. We prepared ours quickly in kiro.dev.
grill-me. Interrogate the spec and resolve the edge cases.- Claude writes, while you verify everything point by point using the checklist.
- Two environments: push to staging (the test server), check everything, and only then move to production.
- A business logic document, so that six months later, it is still clear why the tool works the way it does.
The rest is simply repeating this loop. The tool grows feature by feature, while you understand what you have throughout the entire process, because you set the direction yourself.


 5 min
5 min